So, the previously mentioned CEO Fusco has decided to give another run, this one for the Vulture Mk IV. The prelim images look fantastic. If you're a fan of Mechwarrior and like what the I.S. Stravag call the "Mad Dog".. give it a look:
http://battlemechclub.blogspot.com/2014/12/vulture-mk-iv-pre-order.html
Tuesday, December 30, 2014
Thursday, October 9, 2014
Availability.
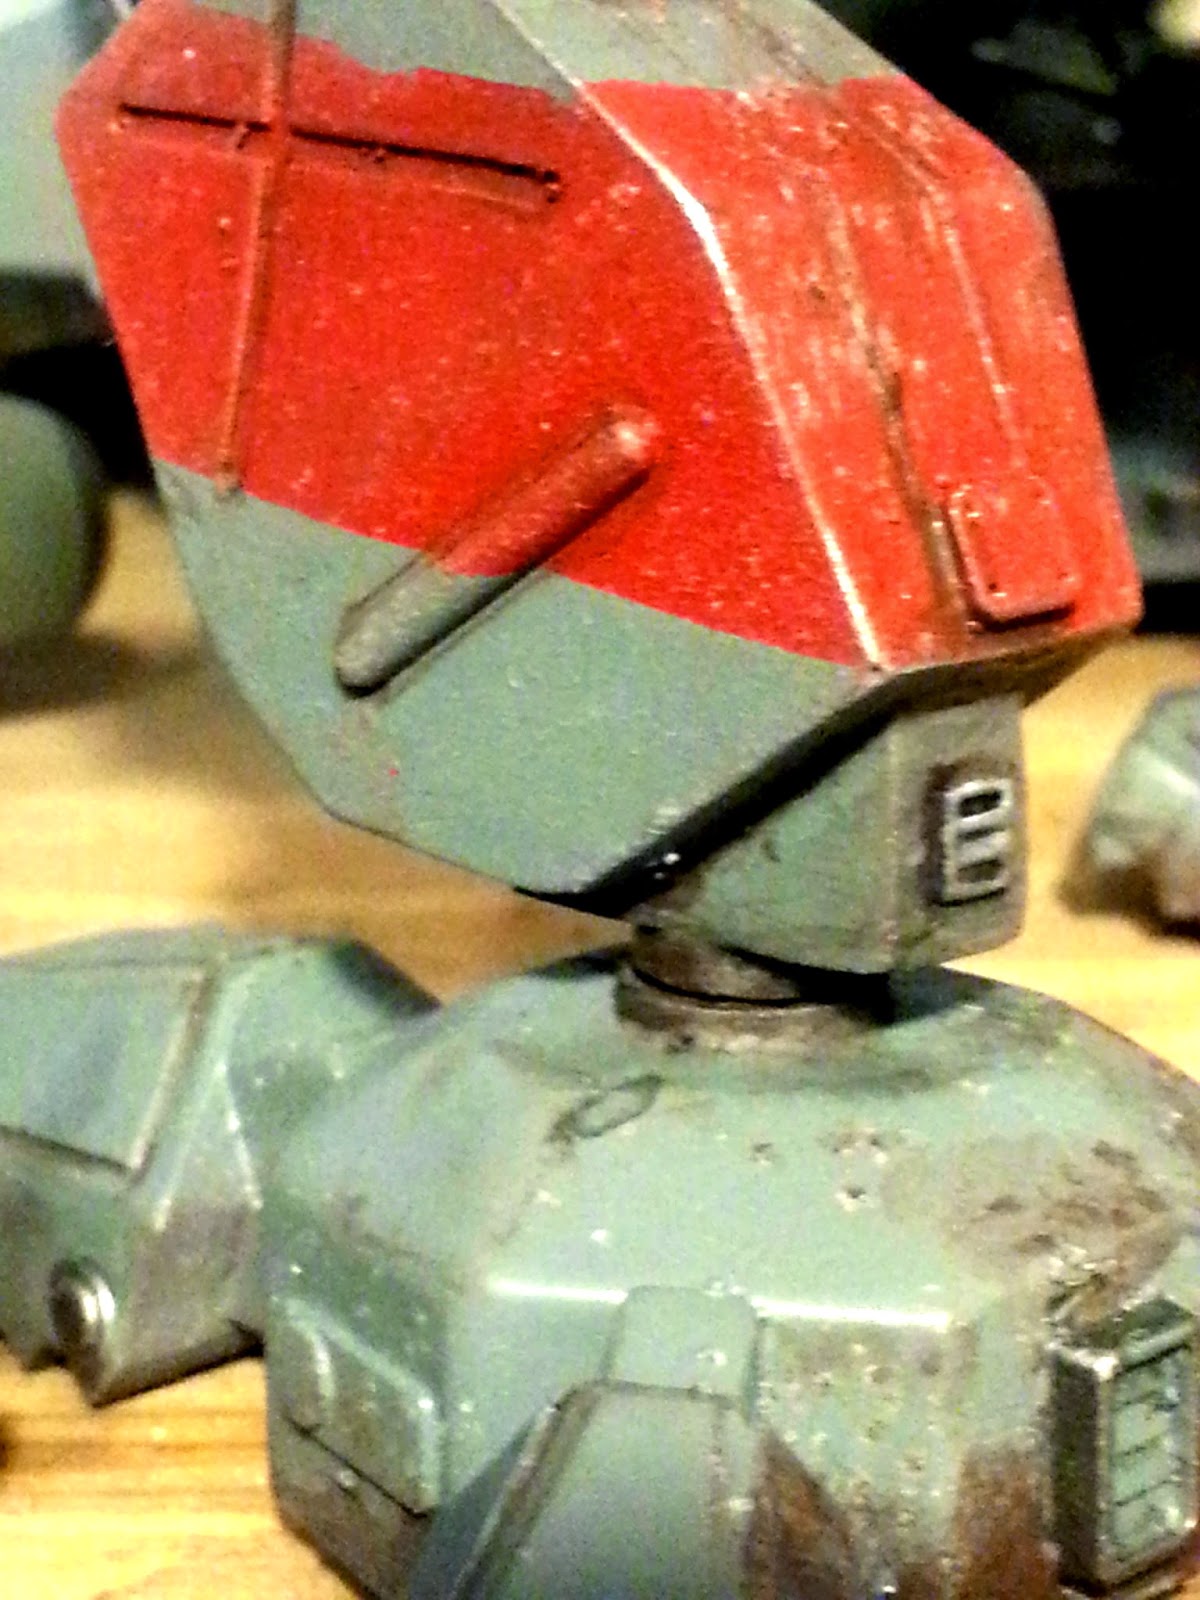
Well, one of the best craftsmen of 'Mechs is shutting down the main factory. http://battlemechclub.blogspot.com/. CEO Fusco has some very legitimate reasons and I can't argue with any of them. Unfortunately for the few of us still sending forces to the front lines, it makes an already small supply line, even smaller. However, he can't maintain what he has been. The market is just not supporting the load, and there's no reason for him to suffer for it. Better to retool for a different process and work on one-offs and specific commissions.
This pretty much means that the only open production line left is Thor's Mechworks. http://wingnutscockpit.blogspot.com/ He has some seriously good looking products rolling out and has a good production capability. So there will be products available for those that want them. The catch is that the machines need serious work to get to a high-level of finish. His designs are really good, and very accurate. They're light and fairly durable. They also have an extremely high level of detail and accuracy to the MWO universe machines. However, the production methodology means that we need to do some seriously intensive finishing work. The printer leaves a layer of gridlines that needs to be sanded down. The best method I've found for that is good, ol' fashioned sandpaper and elbow grease. I tried using acetone, and it has some positive results, but it does melt the surface and leaves behind some residue I don't like.
I did start hollowing out the torso for a cockpit and the way these are made does make it easier. It's a honeycomb of material once you break through the skin, and that's easily dremel'd out. It was far easier than what I had to do for the MK II Timberwolf.
That leads me somewhat to the point: 3d printing is easier for the manufacturer to develop and deliver, but the quality of product for the lower or intermediately skilled modeler presents a serious challenge. There is no casting, no molds, no huge up-front investment, and so it's a much more affordable process to go with. And if you can overlook the gridlines, it's got a lot of detail and finished work/look to it. For the more advanced modeler, the challenges can be overcome with patience and technique. However, speaking as someone in the middle of building a model of my own from scratch, I have to wonder if that time and effort isn't much different than actually building from the ground up.
The kits coming out of Mr. Fusco's pipeline are amazing, and the effort required to get a very good result was minimal at best. The techniques I need to apply to achieve the effect *I* wanted were very straight forward and focused for a specific effect. But even a novice modeler, with just a knowledge of basic pinning and painting techniques, can quickly and easily produce a very good looking result.
Basically, the two types of manufacturing address two separate needs. One puts a huge variety of models out there at a fairly affordable pricetag, more specifically for the manufacturer. The other has a very large initial expense outlay, which minimizes both the variety and quantity available. The skillsets are very disparate but both specialized, although I believe that the 3-D skills are far more prevalent and reinforced throughout our society at this point.
I'm glad Tim will still be working, and will take commissions. Sharing Techniques and tricks is a great thing and it helps the rest of us, and for that, I really appreciate his blog and effort. I am just sad that his work will be much more limited in scope and availability.
Wednesday, August 20, 2014
Decisions.
Work on Project A continues apace. I am just about to the point where I'm going to call done on the legs. I need to scribe in panel lines and other small details and then pin things together.
The hip assembly is framed up and I'm in the process of applying the armor plating and those details. Still have some details to look at there, and then drill the pin holes so I can pin the upper legs to the hip transmission pieces. Speaking of those, I ended up pulling a mold for left/right hip transmissions. The same modeling for hips are used in MWO for the Atlas, Timberwolf, Highlander and several others, so I figure that if I find that I want to try another one of these, I'll just pull 2 more castings of each and I'll have those. The detail came out better on these than the foot, basically because they're much simpler.
Once that's all set, I'll turn my focus to the torso. The main weapons mounts are things I plan to make modular, but the primary model will likely be as a bog-standard DDC. The torso ballistic weapon is something I can easily make a magnetic-swappable module, with PPC, Gauss or AC20. The same with the torso missile housings, I can build it with a 'bay' that will take a modular LRM/SRM etc.. mount. The arm-mounted weapons are all external to the forearm housing, so that's also a simple swap.
This brings me to the other question that I should answer at some point: Kit it or just build it for me? I was talking with He-who-musn't-be-named, and he thought I should kit it out. The thing is, I have no idea where to go or what to do about that. There's no way I want to try doing it myself, I just don't have the resources, equipment or space to try creating all the castings. Starshipmodeler.com lists one resource that might, and I could reach out to find out what I'd be looking at to kit it out. (Timeslip Creations... they list 2 others but both links are dead) Of course, there are tons of considerations here.
First, this is my very first attempt at making something like this and once I paint it up, detail it and so on, it might look just fine. For me. I'm really not convinced it'll meet the scrutiny and standards of the kinds of folks who would want a kit like this. I've seen the work of the modelers out there who've done this kind of thing and I'm definitely in the "raw apprentice" category in comparison. All the techniques and tricks are new to me and I'm just getting to the point where I think I grok what can be done. Second, and a corrollary to the first, is cost. The kits out there are in the average of $120+. FCY's Timberwolf II, which has been restocked ( If you want one, go *here* and act fast!) at $175. His Dervish, (same link) currently in pre-order, is an even century with a req'd 15 for the model to go to production. That tells me that the cost of having a kit mold made and cast up has to be in ballpark of a grand at minimum. Yeah, I can ask, and I should just to know.. but..yeah. Cost. Thirdly, demand. Let's face it, I know I'm something of a rarity, being that big of a battletech fan *and* a 28mm gaming fan at the same time.
If I want to kit it out, I have to *not* do the painting and detailing to finish it off. The caster will have to work with the base/primed pieces. The other thing I can't do is put it all together, so I really can't see it all together at once either.
/shrug. Dunno. I don't have to decide right now, but as it is, I'm leaning toward just building it for me and that's that. I'll be happy to have it and will have the experience and reward of having done it.
Wednesday, August 13, 2014
Project A. With Pixez
So. Now with Pix.
Keep in mind, this is the "rough, still working on it, etc..etc.." stage, so do bear with me.
The initial sculpt of the foot seemed to be ok, and while I could see some imperfections, they didn't seem to be too bad. Now that I look at the closeup images, it's much more obvious.

Yeah, then I cast it. Like I said yesterday, I didn't make absolutely certain that the foot was flush with the base of the mold cylinder, so it was slightly off true. That meant it cast up in such a way that would mean a lot of sanding of the base.


Keep in mind, this is the "rough, still working on it, etc..etc.." stage, so do bear with me.
The initial sculpt of the foot seemed to be ok, and while I could see some imperfections, they didn't seem to be too bad. Now that I look at the closeup images, it's much more obvious.
However, that wasn't the worst of it, since all those imperfections were really magnified by the casting. I LOVE this mold/casting material. All the nice detail comes out crisp and clear. Even the guitar-wire details looked good, but the supposedly "flat armor surfaces" didn't because..well...they weren't. So, putty, sanding and filling time.
Moving on to the joint, I still think the best place for the knee is at the upper-shin spot. It seems to give decent articulation and should look right when posed.
There is still more needed to finish off the thighs and the hip actuator, along with filling in the knee with details and armor.
Looking at the general dimensions of the legs vs the overall height, as compared to the 90-ton Timberwolf Mkii, I think I'm fairly close on size. It should come out just about right.
This is quite a challenging project, filled with all kinds of engineering hurdles and need for creative solutions. Slow going, and it's driving me nuts, but I'm really enjoying it.
Tuesday, August 12, 2014
Next update - Project A and part casting.
Updatedness..next wave.
So, the last couple of weeks, I've been absent from my workbench while taking part in a martial arts event. Upon returning, the mold-making material had arrived and it was time to do my first cast attempt from a clay-sculpted master. Let's say it didn't quite go as planned. I used moldstar 16, the first time I'd used a mold material that set up that quickly. To be fair, I think the mold came out quite nicely. There were a few bubbles present, but when I pulled the air out of the cylinder, they mostly appeared near the top, away from the part.
The issue presented when I found that the flat side of the part didn't quite mate cleanly with the floor of the mold cylinder, making it off-level a bit. This meant that when I poured the plastic resin, it didn't fill quite properly. It also manifested many more bubbles than I expected, and so I had to pour a bit differently, to avoid huge bubble gaps. In the end, that didn't matter as much because of the other main issue: my sculpting ability sux. Well, to be fair, I got the general part dimensions ok, but I didn't see all the surface imperfections and out-of-true lines. They all showed up when I poured the part. In the end, what that meant was that I spent a great deal of time with putty and sandpaper. I still have a little more to do with it, but they are close to being ready for what I want them for.
Project A also needs a bit of decision making. Looking at the legs, there are two locations that serve as the knee joint. In fact, it's entirely possible that the bottom of the thigh and the top of the shin parts BOTH articulate in the MWO model. It's hard to tell and the fact that I can't get a good yootoob of it is frustrating. So, I need to decide which point is the actual knee articulation. The more I look at the stride and stance, the more I think I'll go with the upper shin point. It's also easier to pin and work with at the moment, so that's what I'm going with. Unless, of course, I see something that changes my mind.
Goal for tonight, finish detailing the thighs and cut the main pieces for the hip joint. I test fit the pieces together so far, and stood them next to the Timberwolf II, and I think the dimensions are coming out just about right. The Steiner Scout Mech should be just about the same shoulder height as the missile pods, if they all work out. So far, so good.
Wednesday, July 23, 2014
Updatedness
Well, this is both incredibly frustrating and extremely satisfying, all at the same time.
I have been working on Project W somewhat, although I've hit a bit of a snag in the surface finishing. The acetone works, but I don't like the look of what it leaves behind. The sandpaper also works, but it is a ton of manual effort. I also don't like the way it leaves the surface and there are locations that are nearly impossible to reach. I'm working on a possible dremel solution for the hidden spots, but I need to pick up a different mount for it, which can happen later this week. For everything, the right tool.
So, while I work on figuring that out, I continued to work a bit here and there on Project A. I have the mold rubber and casting plastic coming, so I'll be able to cast the foots. The right and left shins are basically done except for scribing in the plate lines and detailing. I started on the thighs tonight. If the dimensions work out right, this thing should stand about 10 1/2 " at the shoulders, maybe a little bit more, and that should be just about right.
I'm working to follow the basic lines and layout of the MWO Atlas, but I'm leaving some room for creative license and "I just don't know how to do that .." But, I'm trying to keep it as close to what I see in my mechLab as I can. This is, as I mentioned, a very challenging project. It's the first time I've tried to build something up from scratch, more than a kit-bash to get "something" and it's pushing some of my engineer buttons. The dynamics of the joints, the layout and dimensions are interesting. I find that I spend a lot of time sketching and looking at the thing from various angles, just to see what I have to work with. At first, I was concerned that my measurements for the foot were off, but now that I'm seeing the way those base measurements are scaling up, I'm less worried.
To be honest, it's frustrating, but more than that, it's pretty rewarding. I'm seeing this thing come together in layers, piece by piece and it's really making me smile. Every little success is one more challenge overcome and one more bit of encouragement to keep on going. I *have* to be patient while I work it, and that's taking some effort. I keep wanting to move to the next phase, and the next, and the next, but I have to work this thing in order, and take it step by step.
Once I have the lower half worked up, I might just put a pic or two out for show.
Until then, keepin' on, keepin' on.
Sunday, July 13, 2014
I decided, in typical Mal fashion:
So, I chose "let's try two projects at once, for $1000, Alex."
I managed to acquire the foundation for Project W. The raw material for this one requires far more surface prep and work to finish than most that I've worked with. Of course, I also have to do my typical customization and personalization to it, which means there is a ton of work to do here. But, that's what I signed up for.
The parts are 3-d printed. This means that there are a couple of challenges. First, they have this very fine but distinct line pattern on them. It's actually an interesting effect but it does take away from the ferro-fibrous look to the armor plates, so it has to go. I might leave it on a couple of pieces, just for the look. There are a couple of things I can do here. I'm told that acetone works to help smooth them out, but the only acetone I have here in the house is nail polish remover. It didn't do such a good job. I can pick up a tin of full-strength acetone at Hell's Depot, and if I get out there today, I will. The other option is the typical sand, prime, sand, prime routine. I tested that out on a section of the back and that seems to work just fine. The catch is; OMFG TEDIOUS!!!1!!ELEVENTY. That process is definitely going to be one of those "how many movies does it take to get THIS to work? There are lots of interesting angles and tiny spaces that will be difficult to get into. We'll see how it goes. But If I want it to look good, there you go.

A second challenge is the null-space. The printing process means that in many of the negative spaces, there is this latticework of material. I have found that it's not entirely difficult to remove, but you do have to be careful about how you cut it away, so as not to slice into the surface of the model or into your own fingers. I haven't bled yet..so that's good. However, when it's done, you're left with an even more rough surface that needs to be cleaned, and typically THAT surface is in a quite difficult place to reach. We'll see how the acetone works, else I'll just get comfortable in a chair with a dropcloth and listen to some movies for a few weeks.

The second Project is Project A.
I had an opportunity to find one of the old Armorcast Atlas models on EvilBay. Unfortunately, this guy has a reserve, and he has a good idea of just what the market will bear on this kind of kit, if his past auctions are any indicator. I don't bid on reserve auctions as a rule anyway, and as I watched the price climb, and indeed it's still out there as I type, I got into looking at it and found I really don't like the look of Armorcast's sculpt. It looked decent when it was the only incarnation out there, but now, I compare it against the MWO Atlas and I find that the MWO design just looks much more.. Rarr. It has a heavier, meaner, more thunderous look to me, and it has more of the feel of the 100-ton behemoth it's supposed to be. So, I decided that I'd rather not pursue a model that is very expensive and only has a "meh" design.
Here's a pic of the two designs side-by-side.

Last night I reached over and grabbed some of the grey firm sculpey off my desk and figured, what the heck. Let's start from the bottom up. I pulled up the image I have of the Atlas, and started to make stuff. I probaby worked on this thing for a couple of hours, off and on. I took breaks when I got to a point where I was ready to just chuck it all in and went back at it later. As it is now, I have a very rough approximation of about 85% of a foot. I'm reminded of the Foxtrot cartoon where Jason is building a colossal snowman, one giant molecule at a time. I'm actually pretty happy with it, especially considering the fact that I don't sculpt. Sure sure, I see a lot of things that can be improved on it and I'll do some more work before I actually put out a pic of THAT piece.
I'm learning a great deal about my skills and techniques while doing this. I suspect that when I do finish, IF I finish, I'll feel as rewarded by this one as I was about the Serenity.
I managed to acquire the foundation for Project W. The raw material for this one requires far more surface prep and work to finish than most that I've worked with. Of course, I also have to do my typical customization and personalization to it, which means there is a ton of work to do here. But, that's what I signed up for.
The parts are 3-d printed. This means that there are a couple of challenges. First, they have this very fine but distinct line pattern on them. It's actually an interesting effect but it does take away from the ferro-fibrous look to the armor plates, so it has to go. I might leave it on a couple of pieces, just for the look. There are a couple of things I can do here. I'm told that acetone works to help smooth them out, but the only acetone I have here in the house is nail polish remover. It didn't do such a good job. I can pick up a tin of full-strength acetone at Hell's Depot, and if I get out there today, I will. The other option is the typical sand, prime, sand, prime routine. I tested that out on a section of the back and that seems to work just fine. The catch is; OMFG TEDIOUS!!!1!!ELEVENTY. That process is definitely going to be one of those "how many movies does it take to get THIS to work? There are lots of interesting angles and tiny spaces that will be difficult to get into. We'll see how it goes. But If I want it to look good, there you go.
A second challenge is the null-space. The printing process means that in many of the negative spaces, there is this latticework of material. I have found that it's not entirely difficult to remove, but you do have to be careful about how you cut it away, so as not to slice into the surface of the model or into your own fingers. I haven't bled yet..so that's good. However, when it's done, you're left with an even more rough surface that needs to be cleaned, and typically THAT surface is in a quite difficult place to reach. We'll see how the acetone works, else I'll just get comfortable in a chair with a dropcloth and listen to some movies for a few weeks.
The second Project is Project A.
I had an opportunity to find one of the old Armorcast Atlas models on EvilBay. Unfortunately, this guy has a reserve, and he has a good idea of just what the market will bear on this kind of kit, if his past auctions are any indicator. I don't bid on reserve auctions as a rule anyway, and as I watched the price climb, and indeed it's still out there as I type, I got into looking at it and found I really don't like the look of Armorcast's sculpt. It looked decent when it was the only incarnation out there, but now, I compare it against the MWO Atlas and I find that the MWO design just looks much more.. Rarr. It has a heavier, meaner, more thunderous look to me, and it has more of the feel of the 100-ton behemoth it's supposed to be. So, I decided that I'd rather not pursue a model that is very expensive and only has a "meh" design.
Here's a pic of the two designs side-by-side.
Last night I reached over and grabbed some of the grey firm sculpey off my desk and figured, what the heck. Let's start from the bottom up. I pulled up the image I have of the Atlas, and started to make stuff. I probaby worked on this thing for a couple of hours, off and on. I took breaks when I got to a point where I was ready to just chuck it all in and went back at it later. As it is now, I have a very rough approximation of about 85% of a foot. I'm reminded of the Foxtrot cartoon where Jason is building a colossal snowman, one giant molecule at a time. I'm actually pretty happy with it, especially considering the fact that I don't sculpt. Sure sure, I see a lot of things that can be improved on it and I'll do some more work before I actually put out a pic of THAT piece.
I'm learning a great deal about my skills and techniques while doing this. I suspect that when I do finish, IF I finish, I'll feel as rewarded by this one as I was about the Serenity.
Tuesday, June 24, 2014
Next up...
So, what's next?
With the TimberWolf Mk II just waiting for a few finishing touches, the Manufactorum is ready to be retooled for a new project. I have a couple of options, and just need to make a decision.
1) Resume Project T-1. I started out to work on a Prime-variant Timberwolf, when the Mk-II came across my desk. I could return to this one and finish, although it's much more like "getting started" as I really hadn't gotten very far.
2) Project W. The iconic Mechwarrior Battlemech, now unseen, and "the" mech along with the Phoenix Hawk and Jenner that I ran with almost exclusively on the tabletop game.
3) Try my hand at building from scratch. This one is the biggest challenge. While both the above will require heavy custom work to make them what I envision, including custom cockpits and detailing, this is the project that is "all new." Then again, this is also the project that would push my limits more and make me learn. There are some models that come to mind immediately:
Atlas. I mean..seriously. The ultimate Steiner scout mech, and the "other" iconic Battlemech that just says "badness." It's big, it's recognizable and it's a menace to the badguys on the field. I think Armorcast did one at one point, but I never did see it if they did.
Jenner. This one is a personal favorite, just because it is my current favorite scout Mech. Jenner-7F, Twin SSRM and 4 ML, along with 150+ kph of pure annoyance.
Phoenix Hawk. Again, a personal favorite. One of those "are you frakking kidding me" moments during the first table-top campaign we ever ran. Took out a stalker at long range with a bloody lucky headshot. Yeah, I know, it's another of the unseen, but I still like it.
Wolfhound. If you grok the lore, it makes sense. : )
Decisions to make, things to do.
Sunday, June 15, 2014
Mostly done.
So, here we are, pretty much finished with the TimberWolf MkII. I had an absolute blast working on this one and am almost content with the outcome. I am still waiting for the decals to be completed and once done, applied and set.. this project will be complete and I can move on to the next.
I went with my gray and maroon colorscheme, and that matches the scheme that I envision for the Wolves-in-Exile. It'll also go well with my 28mm army scheme too. Call that a win. The cockpit came out well, perhaps not quite as well as I had hoped, but not too bad considering. The next one I do will have some lessons learned. The weathering and scarring is intentional. I wanted her to have that gritty, menacing look of a veteran from campaigns. I used the same scoring techniques as I did when I did Starbuck's Viper MkII, and have been happy with the result. This was also the first time I'd used the salt technique for rust effects and that *really* came out well. It gave the paint a 3-d look to it where the corrosion had begun to wear away under the paint.. I imagine the techs will have quite the job ahead of them replacing panels and the armor plates.
So, enough babbling. On with the photos:
Monday, June 9, 2014
The why of it all.
Why do I do what I do? You know, that is something that can be asked of many aspects of my existence. Of course, once asked, I always find myself stopping and looking at myself and the "things that I do" and shaking my head at the sheer eclecticness that is "Mal."
Side note, yes, I DO self-identify much more to "Malcolm" than to Preston, and so when I reference myself it is far more often some version of Mal than anything else. And yes, I hear Newt's voice in my head among the rest of the chorus too. So there.
Anyway, back to the original question: why do I do what I do? In this context, why do I build models? The short version is that the ten-year-old engineer wants time in the sun. I love creating and I learned to build the things I envisioned in my mind when I was barely 5. One of my father's quotes that has always stuck with me very eloquently sums up this aspect of me; even though it wasn't complimentary. He said, when I showed off a particularly intricate and complex diorama of models when I was about 11, "You'd build entire worlds out of paper and cardboard. Too bad you can't make something real."
He was right, I would. Unfortunately for a ten-year-old in the mid 70's..paper and cardboard was what I had. Clay was, at best, play-doh and rubber mold stuff was nowhere to be found. So I built plastic models and modified and kitbashed and built whole worlds to my heart's content.
What I was doing then is what I am doing now: Telling stories. Another aspect of Mal is the writer, and my modeling is the "show" part to go with the "tell." I get to see the images in my mind come to life under my hands. I get to touch those things that have captivated my imagination for all these years.
It's like this with the Timberwolf. The 'Mechs of the inner sphere have slugged it out for centuries. Then, on an obscure skirmish field in the Periphery, the world exploded in fire and destruction. Striding out of the rising smoke, laying waste to all around it, the Timberwolf came into view.
That moment, that image that I first read nearly a quarter of a century ago, still resounds in my psyche. That moment and a hundred other such moments from a thousand different worlds and realities, all twist and turn inside my mind. With my hands, I give them form, shape, reality.
For a time, I can touch my imagination.
That is why I do what I do.
Ok..back to work....

Friday, June 6, 2014
TimberWolf II, pt. 2.
Keepin' on keepin' on.
The work on the Timberwolf II continues apace. Sadly, work-what-pays-the-bills has been more than a little demanding and I've only been able to dedicate an hour or so a night to the work-that-is-fun. With the customization, that doesn't allow for a lot of progress. Do a bit of greenstuff..then wait for it to cure. Do a bit of Greenstuff..then wait for it to cure. However, I think I am finally to the point where I can basecoat the upper half of the mech.
It took me a while to come up with the paint scheme, and in the end, I decided to go with the color combos I have for the Inquisition. It's a dark gray base with a single blood-maroon stripe. For me, she's going to fulfill a couple of desires. She can do a stand-in as an Imperial Knight or possibly a Warhound Titan on those rare opportunities for me to field such things in the 40K world. When not doing that, she will make a nice centerpiece for a "coming back from a very long campaign" display. Battered, bruised, the hard touch of wear and weather all around, giving her a gritty surviving veteran look.
The Lower half, from the hips on down, is about finished. I decided on a little bit of a wide stance with a slightly downward canted angle for the hip. I wanted to give it a somewhat dynamic look, while it could also not be out of place if, at sometime in the future, I wanted to develop a "mech bay" diorama display for her. Depending on the angle of the torso, it can give the impression of a 'Mech at rest or one about to cut loose. I like that. I pinned the hips and knees, but the weight of the model was too much to be able to rely solely on friction to stay in place. The hip joint to the torso is also pinned and it should be able to stay movable and easily disassembled for transport. (note to self.. I might want to look into a Helmet case for her to as a display...)
I don't think I'm happy with the battery case, but the jury is still out on that.
Lrms. Lrrrrrrmmmmzzzz... gotta haz llllrrrrmmmmzzzz. Yes, it sounds just like it does in your head. I saw Scott over at Messy Desk did a nice LRM20 conversion to the pods and now I'm all kinds of tempted to do that. Of course, there is a piece of me that wants to pop open all those tubes. Then again, there's a piece of me that is an idiot too. Lrm10's on a 90 tonner, I dunno. Ya know, I might just wait until June 16 and see what the Clannerz actually end up fielding. I know I always preferred the 15's on my tabletop Timberwolf, but the 10's might enable a bit bigger engine or more dakka. Why, yes, I *am* using MWO to help me make decisions, why do you ask? :P Decisions decisions.
Yeah, no pics today. Later.
Tuesday, June 3, 2014
Slight sidestep and more work:
so, I've moved the Timberwolf to a side burner for now, as the Manufactorum has had a delivery of parts for a Timberwolf MkII from FCY. I managed to figure out the whole adding images thing..so some are attached below. At any rate, progress is happening.
The first thing I did was get the cockpit built and ready to install. Anyone who knows me knows that I have this thing for cockpits. I really like to look at a ride, whether it's a Viper, a figher, a 'Mech, a tank..whatever, and see that there is a cockpit, controls and possibly pilot. I think that all goes back to the first large-scale plane I built when I was younger, a 1/48 F-14. There's something about it that adds to the realism and believeability of the models. In this case, the MkII cockpit has forward windows rather than a canopy, so the detail can be a bit less than would be for that F-14, but still want it to look good.
I ended up just building a tub, and using photo-etched instrument panels. The pilot is a Catachan guardsman with a Cadian's head/helmet. Clanner helmets are smaller and more fitted than the I.S. Neurohelmets so that works for me. Heat, however, is still heat, and so the bare-armed and vest-wearing Catachan jungle fighter felt right for me. I put him in a fairly dynamic pose and then placed all the final details. Finally, lights. I really didn't have the materials to light up the instrument panels, but the way the cockpit is shaped and formed, the majority of everything is going to be in shadow and darkness. So, I decided that, hey, in for a penny in for a pound; let's light it up.
I mounted a pair of small yellow lights up in the uppper back corners of the cockpit tub, that will shine down on main part of the cockpit. They'll be powered by 3 small watch batteries. I needed to have a space where I could swap them out when they ran down, so that factored in to the what/where/how of placing them. That also cascaded a few more decisions on how to mount the hip to the body. I needed something I could remove, but would also be stable. I thought about magnetizing it, but that was just a bit too insecure for me. So, I just pinned it with some brass bar stock I have. Friction will hold it together just fine and also enable torso/hip twist. I then hollowed out the space for the battery compartment, and it'll sit just above the front part of the hip piece. The position of the space, combined with the hip in close proximity will hide the opening quite well, once everything is painted.
Lit cockpit from the outside

Cockpit from the outside..unlit


I had a small slider switch on hand, and there is a very convenient space on the main body, behind the shoulder mount where it fit nicely. I hollowed out a hole for it to mount and drilled a channel for the wires to go. A little greenstuff to seal the gaps and it's good to go. So really, all I need to do now is solder everything together and then start assembly. The "glass" for the window is from a trimmed down plastic bottle and should give the effect I need.
I made a video of the first stages of the assembly and work, and that can be found here:
https://www.youtube.com/watch?v=vqs4Qs77Kig
Next up will be paint scheme and weathering.
The first thing I did was get the cockpit built and ready to install. Anyone who knows me knows that I have this thing for cockpits. I really like to look at a ride, whether it's a Viper, a figher, a 'Mech, a tank..whatever, and see that there is a cockpit, controls and possibly pilot. I think that all goes back to the first large-scale plane I built when I was younger, a 1/48 F-14. There's something about it that adds to the realism and believeability of the models. In this case, the MkII cockpit has forward windows rather than a canopy, so the detail can be a bit less than would be for that F-14, but still want it to look good.
I ended up just building a tub, and using photo-etched instrument panels. The pilot is a Catachan guardsman with a Cadian's head/helmet. Clanner helmets are smaller and more fitted than the I.S. Neurohelmets so that works for me. Heat, however, is still heat, and so the bare-armed and vest-wearing Catachan jungle fighter felt right for me. I put him in a fairly dynamic pose and then placed all the final details. Finally, lights. I really didn't have the materials to light up the instrument panels, but the way the cockpit is shaped and formed, the majority of everything is going to be in shadow and darkness. So, I decided that, hey, in for a penny in for a pound; let's light it up.
I mounted a pair of small yellow lights up in the uppper back corners of the cockpit tub, that will shine down on main part of the cockpit. They'll be powered by 3 small watch batteries. I needed to have a space where I could swap them out when they ran down, so that factored in to the what/where/how of placing them. That also cascaded a few more decisions on how to mount the hip to the body. I needed something I could remove, but would also be stable. I thought about magnetizing it, but that was just a bit too insecure for me. So, I just pinned it with some brass bar stock I have. Friction will hold it together just fine and also enable torso/hip twist. I then hollowed out the space for the battery compartment, and it'll sit just above the front part of the hip piece. The position of the space, combined with the hip in close proximity will hide the opening quite well, once everything is painted.
Cockpit from the outside..unlit
The cockpit before it was put in.
And the same, from the side.
I had a small slider switch on hand, and there is a very convenient space on the main body, behind the shoulder mount where it fit nicely. I hollowed out a hole for it to mount and drilled a channel for the wires to go. A little greenstuff to seal the gaps and it's good to go. So really, all I need to do now is solder everything together and then start assembly. The "glass" for the window is from a trimmed down plastic bottle and should give the effect I need.
I made a video of the first stages of the assembly and work, and that can be found here:
https://www.youtube.com/watch?v=vqs4Qs77Kig
Next up will be paint scheme and weathering.
Wednesday, April 23, 2014
Glad I try
It worked. Considering it was a first step, and a first try, I'm somewhat impressed.
I ended up casting two takes. The first time, I mixed up too much plastic, and it ended up making a solid copy, just like the original. In the end, it'd make a good practice piece if I want to try carving it up.
The next attempt, I mixed a much smaller portion of the casting plastic, and then rolled it around inside the mold as it set up. I am using smooth-on Smooth-cast 305; and it gives me about 7 minutes pot-time and 30-minutes of cure. it took about 10 minutes to get glutinous enough that I didn't need to keep slushing it around. The result for this was better, and closer to what I wanted to get. It was non-uniform, and some of the places are thinner than I'd like, but that can be fixed with greenstuff.
So, now, I'm trying a third option. I took the mold, and put a layer of clay on the inside, and then poured a third layer of the mold material. Now, when it finishes setting up, it SHOULD leave a void that is about 1/8"ish thick. If I try something like this again, I may just do a single cast for the outside and then the internal plug. We'll see how it comes out....
Firsts
For the first time, I’m giving a shot at rubber mold
casting. This is something I have wanted to do for a long time, and I’ve
always been reticent to give it a try. To be honest, this stuff
ain’t cheap, so I have to be willing to sink a couple $$ into just taking a
chance. This is one of those things where there is a whole
cascade of events waiting on “something” to give. I would like to
build from scratch, and the engineering of the models isn’t so hard, that stuff
I can do in my sleep. It’s the sculpting/molding/casting of them that has
held me back so far. Because I didn’t know how to do any of that, or at
best, didn’t have faith that I could figure it out, *all* of those
projects have been basically on hold.
Now, if this works out, that pretty much opens the door to
trying out the sculpting and designing.
So..I got my hands on a part that I want to try, and am giving it a go. First off, yes, it’s a re-cast of the original TimberWolf. I’m justifying the recast in 2 ways: first, this is a one-off and the part will not be available to anyone else. Second, the whole reason I’m doing this is so I can carve the thing up and custom build a cockpit into it. The original piece is a solid chunk of resin and it doesn’t lend itself well to the design. I’m hoping to cast this hollow, or mostly so, leaving me a much more reasonable task to carve in the space and build out the cockpit. And, if it all fails, I haven’t destroyed the Mk-I Timberwolf.
So..I got my hands on a part that I want to try, and am giving it a go. First off, yes, it’s a re-cast of the original TimberWolf. I’m justifying the recast in 2 ways: first, this is a one-off and the part will not be available to anyone else. Second, the whole reason I’m doing this is so I can carve the thing up and custom build a cockpit into it. The original piece is a solid chunk of resin and it doesn’t lend itself well to the design. I’m hoping to cast this hollow, or mostly so, leaving me a much more reasonable task to carve in the space and build out the cockpit. And, if it all fails, I haven’t destroyed the Mk-I Timberwolf.
And thus it goes. I made up a mold space from a
bottle. Coated the part with Mold-release 200 and then packed clay around
it. I used the clay and newspaper to fill space. Future
reference, I think I’d rather use cardboard rather than try to do this
again. It’ll be easier to work with. I mixed up the smooth-on
30 and gave it a pour. Then, just to help matters a little, I put a
cone on top of the mold space and pulled a vacuum a bit to help get some of the
bubbles out. I may not have given it enough, but we’ll see.
Round 2 is tonight.
Round 2 is tonight.
Thursday, April 17, 2014
And we're off.
Who am I? That’s not so easily answered. Like
most folks, I have all kinds of facets to who I am and things I like to
do. For the purposes of this blog, I am “Mal the modeler.”
I’ve been building models since I was young, as it was the best way to exercise
my creativity at the time. I’ve always been enamored of “accuratizing”
“accurizing?” “making more accurate” model kits, and that expanded into
kit-bashing models that existed in my mind’s eye. I’ve done
militaria, cars, and planes, but sci-fi has always been my first
love/passion. Star Trek, Space1999, Star Wars, Galactica, anything
that had cool looking hardware; the more realistic the better.
Incorporated into this now is Battletech, Warhammer and Warhammer
40k. The grimdark future sure has some fun modeling potential.
These days there are all kinds of options available for
making new and interesting things, but I still prefer the razor knife, glue and
greenstuff.
I started this blog so I had a place to both document my “on
the bench” things and also nudge myself along to keep building; without filling
up the faceyspacey world. Let’s face it, faceyspacey is a big town
square-like space, and I really don’t need to put these creative things out
there. This is my little space of thinking, planning, designing
and..well.. playing. Because for me, engineering, designing and
building really is playing.
I have a few new and different things I want to try.
One of which is custom sculpting and casting. I keep looking at
things that folks have done, and keep wanting to try. I need to quit
wanting and start doing. I have a few ideas on what:
1)
28mm Atlas. The MechWarrior’s
super-ride. 100 tons of walking badassness. I have a
Timberwolf Mk II on the way, and this would go great as a companion
piece.
2)
28mm Jenner. This is a personal favorite.
Yeah, it’s a light ‘mech, but it’s the one I prefer to drive in
MWO. 4ML’s, 2 SSRM packs and 152+ kph of pure annoyance.
3)
28mm Warhammer. The great
unseen-one. I think the reason for liking this one goes without
saying.
4)
28mm 40K Inquisitorial Warhound. I love
Titans. Can’t play with them often, but have always liked the look of the
40K “Battlemechs.”
Yeah, doing them all at 28mm,
which is roughly 1/60. (1/58, I think). It’s a nice scale and it
goes well with the 40K hardware. It’s not a common one, so the
really cool “kits” of the standard-interest stuff are out of scale, but that’s
fine. It’s nice to do something different.
I’ve also got a Timberwolf, Mk II on the way. At
the very least, there’ll be a cockpit. I’ll have to see how the kit
goes together to decide how much more I may want to do to it. It’s
one of the few Clanner ‘Mechs that cut a silhouette that I like.
Impressive, imposing, menacing. Like the Warhammer.
So.. here begins the blog. Off I go. Let’s see
where I end up.
Subscribe to:
Posts (Atom)