Tuesday, November 10, 2015

slow but steady


Work on Project H and Project V continues. 

I have been working concurrently with both Project V and H, for the most part working from the ground up. 

 Project V is mostly an "assemble" job with the exception of the custom work being done to the torso to add a cockpit and lighting.  I've gotten the torso hollowed out and the battery compartment drilled out as well.  When I made the compartment for Malekith, I went through all the trouble to put a custom hinge on it and everything. When Tarl painted it.. he just ripped that off and used magnets.  DUH!?!?  why didn't I think of that?   So, what I will do for both V and H will be to mount cover plates using magnets.  The switch for V will be hidden in the SRM launcher tube.  

For project H, the switch will be in the greeblies on the back. 

Since all the custom work for both of these is in the torso, I've been working on the assemblies from the hip down.  Granted, Proj. H is *all* custom, but you get the idea. 

For V.. I splayed the hips a little, which has the effect of also slightly tilting the torso plane.  When I put the torso on, that twist should add to the dynamic pose and give it a good action feel.  The paint scheme for V is a mostly-black with red highlights scheme for HWSNBN's merc unit.  I hate black.  Black is such a challenging color to weather nicely.  I'm building it with a battered-and-used look that feels appropriate for a Merc unit that lives off salvage and luck.  The black paint is put over a previous-owner's gray colorscheme, and that is showing through the chips and scratches and scrapes with some going all the way down to the core armor.  The fun part of black is that the usual weathering techniques of oil leaks, carbon scoring, smudging and shading doesn't show against the dark color.  So I'll have to use dirt and off-shading to try to give it a heavily beaten look. 

Below is the way I have it looking so far. Before I hit it with the next wave of shading, I'll give it a pass with matte varnish, to dull down the shiney, and hopefully that'll help with the aging techniques.


The torso work for the V is coming along.  I've managed to hollow it out and get the battery compartment ready.  The batteries will go under the right arm with the switch hidden as mentioned above.  I still need to get the head ready, but the cockpit will be built into a tub fastened to the head canopy.


As for Project H, his chosen scheme is a base of Red, with Gold and Black accents.    I'm also going with the Mercenary Mech beaten and weather-worn look for the Mech, and will work in some heavier damage to the hatchet and lower legs.  The red can take the shading better and I can use different tones for various panels, etc., while the damage on the legs makes sense; the Hatchet man’s notoriously lightly armored legs are well known as primary targets during combat, and any mech that is built for closing to melee range is going to bear the scars of kicks being delivered in desperate retribution.

This is the base color tone.. there is still a huge amount of detailing for the panels and joints to do.  This is also my first attempt at using pigments and I'm very not happy with it.  I'll be practicing a bit more on some other equipment and then touching up on it.  I have a feeling that I'll be needing pigments for the Victor build as well.


For the most part, the parts for H go together well.  I pinned the ankles and got a decently dynamic pose going, incorporated with the upper body holding the hatchet raised high and the left hand pointing for a shot from the ML.  The one thing I don't like about this mech is the lack of pose ability to the cockpit.  Then again, most Mech’s don't have a variable cockpit and that's one of the nice things about the Victor.  It really is amazing what just that little turn of the head can do to communicate intent and action.  That, however, is all  part of the mech design.. not unlike the Hunchback or the Warhammer.  The cockpit is locked and there really isn't a way to design a "pose" into it otherwise. 

However, it is hollowed and ready, with the overhead light fixed in place. 


The more I do this one, I'm finding little things that would help for future designs.  It seems that when doing the Victor, Mr. Fusco used some very thin panel overlays rather than scribing in panel lines.  Well that's gorram intelligent. Simple, more blocky parts make for easier building and designs, but sadly, that is exactly why Mr. F passed on this one.. : )  "all those damned curves!"  hehe. 

Sunday, October 4, 2015

Productivity.

Well, productive weekend.  I had a TON of stuff to do for work, but since it was a whole lot of "do this, then wait to do that, rinse, repeat"..  had a lot of time to fiddle with my hands. 

So, I took some supersculpey firm, and tried again to carve a major part out of clay.  It didn't work so well when I did the foot for the DDC, and this time I had challenges as well.  The hip is a weird ellipse shape as well as being on a sharp angle up toward the pivot point of the torso.  But, it actually came out better than I thought it would.  I plated it up with some 1mm sintra pieces to give it texture and carved in some panel lines.  There are still some inconsistencies in the layers but the panels and lines seem to break it up enough to the point that it works.


While I was at it, I got the shoulder piece, upper arm and lower arm done.  The arm parts are reversable to swap from right to left, so that helps.  I poured molds for all of the above and pulled casts for them all and I'm fairly  happy with the result. 

These aren't quite up to the ol' pros standards (Fusco, Messydesk, et al), but they work.  The casts give me a good base to work from, and with cleanup, extra panels and greeblies, they should be acceptable. 


I got the arm articulation pinned up just to check and they worked just about where I'd like.  I kinda might want a change to the shoulder joint for more up/down transition, but I can still pose JrJrJr's in a pretty dynamic option.  The available poses for the articulation across the board is pretty good. 


Yet to do, I have the hands, torso and head.  I'm not excited about carving up the hands.  Since the right is a fist, that'll be easy.  I might cheat and just mount the ML for the left arm on the wrist.. but I think that's cheating.  : )   As for the head, I would like to see a head that can turn a bit, but that's a bit tough given the position it has in the torso.  I think that the turn of a head really can add dynamicism to the pose, but it may not quite work with this mech.  We'll see. 


Anyway.. that's it so far.  More to come.

Thursday, October 1, 2015

more work

Well, I did some cleanup and rework on Proj. H's legs.  I found that I don't like the ankle.  I am wondering if it would be better as a ball-and-pin.. where the ball sits into the ankle of the armored shin, and a pin goes into the top of the foot.  What I have done for this one is just cut the ankle and pinned it for rotation parallel to the ground.   If I were to try casting it for others, that might be what I'd think about, but I'm not sure if I'm willing to go that route yet. 

Even though I beefed up the legs a little, they still have that spindly look that the H is notorious for, so that was a side benefit.  I also re-cast the greeblies for the outside of the hip joint and I'm much happier about that one.


I was starting to get a bit concerned that it might be a bit out of scale to the 45 ton size of the Hatchetman. So I pulled the lower part of Project V-1 and set it side-by-side with them, and it looks like it just might be right. 

 
Now on to the hip and torso.....

Wednesday, September 30, 2015

oops

..crap.  I was just going through some of the sketches for the inspiration for Project H, and realized; I forgot the jumpjets. 

Ok.. I can fix this. They're mounted to the legs, so I can make Jumpjet greeblies to add to the thigh or shins. 

Another thing I'm still chewing on is the AC-10 mounted in the right torso.  In almost all the sketches, it's represented as just a hole in the front armor.  Blech.  I think that looks stupid.  But then, just having a tube sticking out of the armor would look just as bad.   I might want to alter it a bit to mount a gun assembly something like the under-slung package that the Atlas carries.  At least that would have a more interesting look to the build. 

The MLs mounted to each arm are simple enough, but that AC-10 definitely needs some design work. 

Tuesday, September 29, 2015

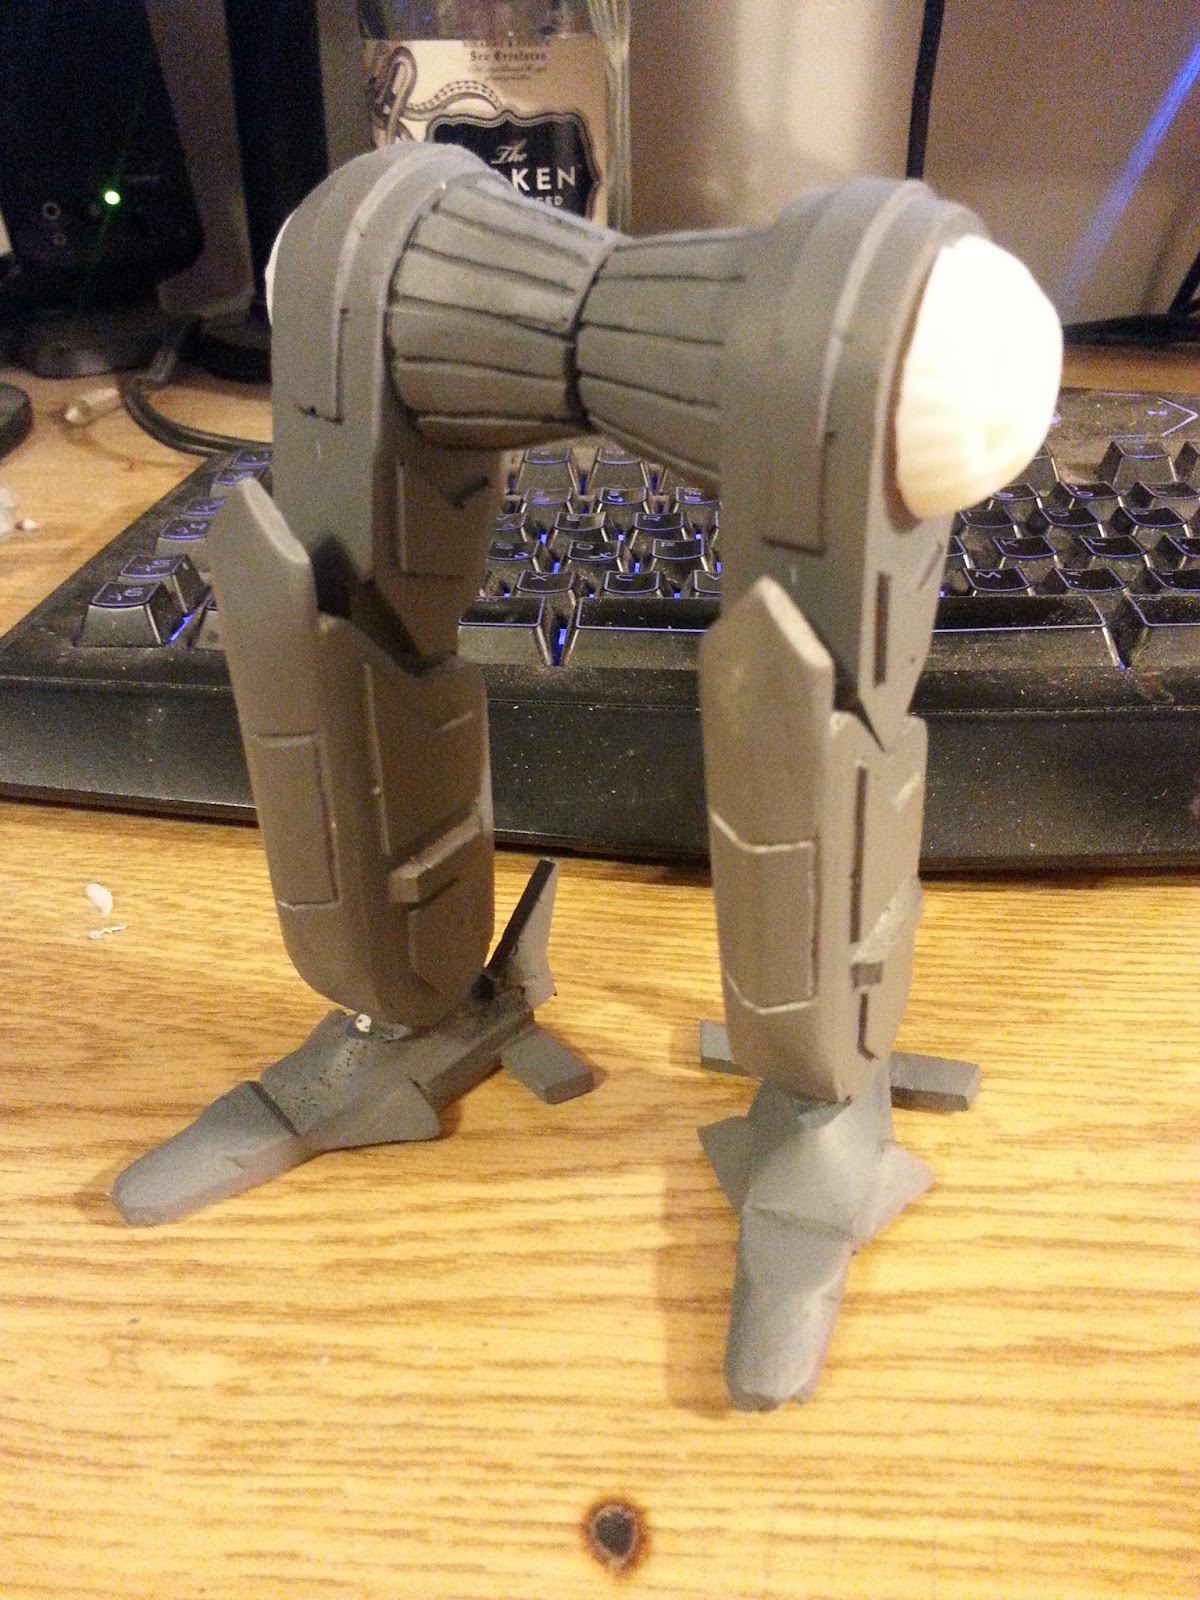
coupla pix -Project H.

First attempt at the legs.


Given my experience casting.. I'm not entirely unhappy.  

The foot came out ok.. a bit of cleanup and it should be ok.  The lower shin..same.  I'm not very happy with the scribe lines but I think I can clean that up too.  The upper thigh is better, that one I'm actually happy about.  The hip joint is ... meh.   I cast a greeblie for the the outside of it and that I am NOT happy over.  However, I have the greeblie from which I cast it that I can use.  .. I'll try a second run on that. 


the molds


The first set of casts


 First set of casts with the original pieces. The thigh piece lost the center detail strip in the de-molding, but it shows clearly on the cast pieces.


Monday, September 28, 2015

It begins.


So, Project H and Project V-1 are underway.  I do not expect P-H to be up to the standards of followers of guys like Fusco or MessyDesk, but hopefully it'll be good enough for the son of he-who-shall-not-be-named.  The intent is to make the pieces such that I can pseudo-cast them.  In essence, I'd like to be able to replicate them a couple of times, but the expectations I have on the casting are not high.  I don't own a de-gasser or a pressure caster, both items I would like to acquire at some point.  However, I did pick up some Mold-star 20-t and a some big ol' jugs of smooth-cast 300.  At the least, the parts should come out serviceable and give a decent base shape upon which to build up the details and final structures for it.

So, to start off project H... the foot. 

The 'Mech's design, as shows in the TRO, looks crappy.  It's just waaaay to spindly to be functional to my engineering brain.  So the build I'm making is going to have a much more MWO feel to it, and while it'll still have the curves and main shapes that the H is famous for, the legs and arms are going to be a bit beefier and more armored.  I have a concept in mind for the hip joint that'll allow for it to open its stance, and that should allow for some dynamic poses.  As I write this, it comes to me that also changes the way I'm going to do the hip-torso parts, making it as a 3-part linkage rather than a ball/socket or Pin. 

(I love it when my engineer brain can play) 

This is my first use of the Moldstar 20-t.  it's basically the same as 16-T as far as setup time and cure time.  The big difference I see is the color.  16-t A & B are blue and white, giving an off-blue color when mixed and you can see the unmixed "a" part.   This stuff is all translucent, so it's harder for me to tell if it's fully mixed.  The benefit is that I can see the airbubbles that are in the matrix as it's mixed.  (hence the desire for a de-gasser.)  I don't think that there are MORE bubbles in this than in the 16-T, just that I can actually see them, so now I'm aware of them.  However, I have been happy with the 2 test molds I've made with this stuff so far. 

The first castings of the Proj H feet came out and they're up to the standard I expected.  They're decent if a bit rough, but the general shape now is good compared to having to build them each up from stock. 


Project V-1 has my hands shaking.  I commissioned Mr Fusco for the V and that was no small request.  The kit is absolutely superb and I love this machine.  The catch is..now it's time to cut into it.  Yep, building up the cockpit and lighting the thing, which means taking the dremel to the head and torso.  That's the part that I am just a-skeered to do. Yeah, it'll be fine once the blade hits resin, but it's that first dig that's hard.   I have blue 1.8mm leds to hook up for the lighting and I'll put that in the forward upper part of the cockpit head and since it'll be a closed cockpit, I only really have to detail the pilot, seat and the back of the compartment.  I'm thinking of giving it a bit of a Millennium falcon look, with glowy switches in the back, but then I think that's a bit out of character for the machine.  It really should have more of a fighter/bomber look, with the controls easily accessable for a single pilot.  So I have to find a good mix of "looking cool" and "looking functional." 

Oh yeah.. Neurohelmet.  This one has to have the old-school Inner-sphere neuro helmet.  It IS an old-school Inner Sphere Merc 'Mech, after all. 

I want to build this up with as much a realistic look as possible.  I have to determine the battle damage level, paint scarring, and the general stance.  The ankles and knees for this will need to be set.  The hip and shoulders are likely more posable, and can be left movable.  I am considering pinning the elbows so they can be posable as well, but that may be more effort than it's worth.  It may just make sense to set the whole machine in a threatening pose with the AC-20 raised. 

Also, the SRM-4 launcher on the front torso is another point for detail.  I'd like to drill them out a bit more and drop in "missile tips" so it has the loaded launcher look.  I haven't figured out what to use to make those tips yet, but I'll come up with something.  

This one will definitely be battle damaged. I'm contemplating having a couple parts have the "salvaged from the battlefield" look with either a different paintjob or alternatively a "very very brand new" paint scheme to it, complete with missmatched colors and so on.  ..

Here goes......

Monday, August 24, 2015

Construction season soon..

So, sadly the workbench has seen a lot more "bench" than "work" of late. 

For the most part, July thru August sees an annual prioritization of a different pursuit, and I've not had much opportunity to attack the workbench.  That is not to say that the mental wheels have not been spinning, because they have.  Primarily on two fronts.

First, how to do the color scheme.   The Paint job for Project V is for someone who ran a merc company "back in the day."  That is to say, a while ago.  His Victor was "Black with gold trim."  So, ok.. Merc, which means "running on salvage."  Basic color scheme of black. I've seen some tutorials on non-metallic metals in black, and I think I can do those.  Since it'll be a Merc 'mech, there'll varied levels of weathering, coloration fading, etc.   The 'gold' is probably going to be more brass/bronze than gold.. depends.  I need to look at the overall silhouette and figure good places, locations for that coloration, and then weather those accordingly.

A challenge?  You bet.  But I think I can.. I think I can..

The second challenge is, of course, the cockpit. The TimberWolf had a very wide open viewscreen, and much of the cockpit detail was visible. Not so much with the Victor.  Te Victor's forward window is small, so there doesn't "need" to be a lot of detail.  Which means, I think I need to put an open-able hatch on it so all the cool cockpitty-stuff can be seen.  (?)  Or, you know, cheat and just do enough to make it look cool on the outside.  Yeah, that's not likely.  The thing I haven't figured out yet is just where said hatch should go.  I could have the head just lay back, opening up the whole tub, but that doesn't work with my engineer brain.  If *I* was building a mech for combat, that kind of vulnerability is the LAST thing I'd design into it.  I'm thinking that I need to find a good spot somewhere on the cranium to put a hatch. 

I also would like to pin-and-magnetize the main joints, so the client can play with poses.  That's minor stuff tho.