Projects V and H are in the final stages.
The battery cases for the LR44's finally came in and I can now get them installed into the machines. That was the last bit I was waiting for.
Last evening I finished off the cockpit of the Hatchetman, then attached the head to the torso and sealed it. With the wiring and switch all installed, and the primary assembly done, now it's all about the final painting and detailing. I'll be mounting this to a base, just to keep it stable and safe. JrJrJr may end up using it if we can ever play a game or two of full-scale Battletech. Even if not, the base is good for the pose and dynamics of the model itself.
As I think on it, I believe that I'm rather pleased with how well the general design came out, especially the torso. The legs are "meh" and I can see things I'd rather do differently. The torso could use a slightly wider waist for the pivot. The arms could stand more detail. You get the idea. I'm going to let the putty cure on it before I finish the painting, so the final reveal shots will probably be around Thanksgiving, and yawl can tell me what you think.
All in all, I learned a ton while working this model up. The biggest lessons were about sculpting and casting. Sculpting is a pretty interesting technique, but I think I would rather do a build-up of parts rather than actually sculpt them. The arms for the H were sculpts, everything else was build-up from frames, greeblies and putty. Those tend to look better, probably because I have a ton more experience with that and can do it better.
As for casting, I'd really like to give vacuum and pressure a try. I'll need the equipment to do it, and that'd be a fairly sizable investment. Thing is, I really learn best hands-on, and without a mentor to guide me, I'm hesitant to just start spending money. I have about 4 grand in rc helicopter stuff sitting around because I didn't know what I was doing, and I'd rather not waste $ on buying a pressure container that I can't actually use. Then again, even if I DID get good equipment, will I use it enough to justify it? I can see options; not just 'Mech designs, but props and things for the Professor as well as the Mandalorian projects. But, again, will it be worth it? I'm no JPG Productions and doubt I'd ever get to that skill level. So.. is it worth it? Need to think on it.
Project V is also pretty close to done. I finalized the cockpit and got it all wired up and inset into the head. I just need to finish the wiring for it, and then just put it all together. Unlike the H, the Victor was able to be mostly completed without the cockpit. That is just a drop-in to the head and then set that in to the tub of the torso. All the wiring and everything around the cockpit is internal and so I was able to mostly complete the painting and everything for it before now.
This one was a pure assemble job, very little custom work needed except for all the dremelling of the torso and head to fit in the cockpit. Love this kit and it was worth every penny of the commission to get it. HWSNBN will hopefully like it as well. As with the Hatchetman, I should have it finally completed sometime next week, and reveal shots will come out then.
Now it's time to gear up for the Atlas and Warhammer. Right about the time I get these done, I'll put a bit of time in on the warehouse background and then the Atlas should be arriving. Now that I have some other techniques learned and under the belt, I think I'm ready to tackle that and the Warhammer.
Keep on keepin' on...
Friday, November 20, 2015

Saturday, November 14, 2015
slightly better photos
I didn't like the color balance and exposure of taking shots on my desk, so I threw together a little warehouse background to take some other photos against. I need a good display for the Mechs as I finish *mine* (I only have the one), and a warehouse interior is what I always visualize. So, I figured I may as well knock off the basics and I can do a build-up of it and all as time goes forward, but for now it gives a better spot to take in-progress pics.

I still need to do a lot of weathering to both, and especially to the Victor. That's why the AC is still off. I want that part to be blatantly new-ish relative to the rest of the 'mech. Once I have this thing all pigmented up, etc, I'll attach it.


The last shot above you can see the start of the glow effect I'm doing on the Medium Laser emitters. Some folk may go for the lens look but I like this better. :)
I'm waiting on the battery containers for these two and a couple bits and bobs to finish up the cockpit build. However, the basic components are nearly ready. The H will have the cockpit actually assembled into the head and dropped into the torso. I find it funny.. I'm doing it that way because it's the most convenient given the shape of the head and the cockpit. And this is the one mech where the whole head/cockpit is an escape pod. Yeah.. geek humor. Until I get the decals for instrumentation that I'm waiting for, I can't do much more on it. I was surprised at just how much of the surface of the interior would be visible.
As for the V, the cockpit is actually in a tub that will be attached to the canopy. I have a magnet in the bottom, and there's a magnet mounted in the hollowed out part of the torso, the whole of which will let the cockpit turn based on HWSNBN's desire. I have the lights mounted on the tub and all I need left to do here is get the instrumentation panels installed and then attach it to the hollowed out head.


So, there we go. Off to weather and beat these things up.
More to come later..

I still need to do a lot of weathering to both, and especially to the Victor. That's why the AC is still off. I want that part to be blatantly new-ish relative to the rest of the 'mech. Once I have this thing all pigmented up, etc, I'll attach it.


The last shot above you can see the start of the glow effect I'm doing on the Medium Laser emitters. Some folk may go for the lens look but I like this better. :)
I'm waiting on the battery containers for these two and a couple bits and bobs to finish up the cockpit build. However, the basic components are nearly ready. The H will have the cockpit actually assembled into the head and dropped into the torso. I find it funny.. I'm doing it that way because it's the most convenient given the shape of the head and the cockpit. And this is the one mech where the whole head/cockpit is an escape pod. Yeah.. geek humor. Until I get the decals for instrumentation that I'm waiting for, I can't do much more on it. I was surprised at just how much of the surface of the interior would be visible.
As for the V, the cockpit is actually in a tub that will be attached to the canopy. I have a magnet in the bottom, and there's a magnet mounted in the hollowed out part of the torso, the whole of which will let the cockpit turn based on HWSNBN's desire. I have the lights mounted on the tub and all I need left to do here is get the instrumentation panels installed and then attach it to the hollowed out head.


More to come later..
Friday, November 13, 2015
Productive week
So, this week has been a good one. The doc told me I needed to take some time away from work, so I've spent it mostly focused on working up Proj H and V.
I got most of the base colors and build done for H. I just need a couple details to show up in the mail so I can finish the cockpit build, and do the final assembly. As it is now, it's time to start all the fiddlybits of doing the shading, rusting and dusting.
The chipping has been completed, and I've done a lot of the panel shading completed. Now I'm working on slowly building up all the score marks, oil streaks, leaks, and and impact damage.


Oh, and every good mechwarrior names their ride, yeah? Considering that Jrjrjr is a 40K demons player.... it fits his style. The closeup looks like crap because I haven't finished all the blending, but ..yeah.

I got most of the base colors and build done for H. I just need a couple details to show up in the mail so I can finish the cockpit build, and do the final assembly. As it is now, it's time to start all the fiddlybits of doing the shading, rusting and dusting.
The chipping has been completed, and I've done a lot of the panel shading completed. Now I'm working on slowly building up all the score marks, oil streaks, leaks, and and impact damage.


Oh, and every good mechwarrior names their ride, yeah? Considering that Jrjrjr is a 40K demons player.... it fits his style. The closeup looks like crap because I haven't finished all the blending, but ..yeah.
Tuesday, November 10, 2015
slow but steady
Work on Project H and Project V continues.
I have been working concurrently with both Project V and H,
for the most part working from the ground up.
For project H, the switch will be in the greeblies on the
back.
Since all the custom work for both of these is in the torso,
I've been working on the assemblies from the hip down. Granted, Proj. H
is *all* custom, but you get the idea.

For V.. I splayed the hips a little, which has the effect of
also slightly tilting the torso plane. When I put the torso on, that
twist should add to the dynamic pose and give it a good action feel. The
paint scheme for V is a mostly-black with red highlights scheme for HWSNBN's
merc unit. I hate black. Black is such a challenging color to
weather nicely. I'm building it with a battered-and-used look that feels
appropriate for a Merc unit that lives off salvage and luck. The black
paint is put over a previous-owner's gray colorscheme, and that is showing
through the chips and scratches and scrapes with some going all the way down to
the core armor. The fun part of black is that the usual weathering
techniques of oil leaks, carbon scoring, smudging and shading doesn't show
against the dark color. So I'll have to use dirt and off-shading to try
to give it a heavily beaten look.
Below is the way I have it looking so far. Before I hit it
with the next wave of shading, I'll give it a pass with matte varnish, to dull
down the shiney, and hopefully that'll help with the aging techniques.


The torso work for the V is coming along. I've managed to hollow it out and get the battery compartment ready. The batteries will go under the right arm with the switch hidden as mentioned above. I still need to get the head ready, but the cockpit will be built into a tub fastened to the head canopy.


As for Project H, his chosen scheme is a base of Red, with
Gold and Black accents. I'm also going with the Mercenary
Mech beaten and weather-worn look for the Mech, and will work in some heavier
damage to the hatchet and lower legs. The red can take the shading better
and I can use different tones for various panels, etc., while the damage on the
legs makes sense; the Hatchet man’s notoriously lightly armored legs are well
known as primary targets during combat, and any mech that is built for closing
to melee range is going to bear the scars of kicks being delivered in desperate
retribution.
This is the base color tone.. there is still a huge amount
of detailing for the panels and joints to do. This is also my first
attempt at using pigments and I'm very not happy with it. I'll be
practicing a bit more on some other equipment and then touching up on it.
I have a feeling that I'll be needing pigments for the Victor build as well.


For the most part, the parts for H go together well. I
pinned the ankles and got a decently dynamic pose going, incorporated with the
upper body holding the hatchet raised high and the left hand pointing for a shot
from the ML. The one thing I don't like about this mech is the lack of
pose ability to the cockpit. Then again, most Mech’s don't have a
variable cockpit and that's one of the nice things about the Victor. It
really is amazing what just that little turn of the head can do to communicate
intent and action. That, however, is all part of the mech design..
not unlike the Hunchback or the Warhammer. The cockpit is locked and
there really isn't a way to design a "pose" into it otherwise.
However, it is hollowed and ready, with the overhead light fixed in place.


The more I do this one, I'm finding little things that would
help for future designs. It seems that when doing the Victor, Mr. Fusco
used some very thin panel overlays rather than scribing in panel lines.
Well that's gorram intelligent. Simple, more blocky parts make for easier
building and designs, but sadly, that is exactly why Mr. F passed on this one..
: ) "all those damned curves!" hehe.
Sunday, October 4, 2015
Productivity.
Well, productive weekend. I had a TON of stuff to do for work, but since it was a whole lot of "do this, then wait to do that, rinse, repeat".. had a lot of time to fiddle with my hands.
So, I took some supersculpey firm, and tried again to carve a major part out of clay. It didn't work so well when I did the foot for the DDC, and this time I had challenges as well. The hip is a weird ellipse shape as well as being on a sharp angle up toward the pivot point of the torso. But, it actually came out better than I thought it would. I plated it up with some 1mm sintra pieces to give it texture and carved in some panel lines. There are still some inconsistencies in the layers but the panels and lines seem to break it up enough to the point that it works.


While I was at it, I got the shoulder piece, upper arm and lower arm done. The arm parts are reversable to swap from right to left, so that helps. I poured molds for all of the above and pulled casts for them all and I'm fairly happy with the result.
These aren't quite up to the ol' pros standards (Fusco, Messydesk, et al), but they work. The casts give me a good base to work from, and with cleanup, extra panels and greeblies, they should be acceptable.


I got the arm articulation pinned up just to check and they worked just about where I'd like. I kinda might want a change to the shoulder joint for more up/down transition, but I can still pose JrJrJr's in a pretty dynamic option. The available poses for the articulation across the board is pretty good.


Yet to do, I have the hands, torso and head. I'm not excited about carving up the hands. Since the right is a fist, that'll be easy. I might cheat and just mount the ML for the left arm on the wrist.. but I think that's cheating. : ) As for the head, I would like to see a head that can turn a bit, but that's a bit tough given the position it has in the torso. I think that the turn of a head really can add dynamicism to the pose, but it may not quite work with this mech. We'll see.

Anyway.. that's it so far. More to come.
So, I took some supersculpey firm, and tried again to carve a major part out of clay. It didn't work so well when I did the foot for the DDC, and this time I had challenges as well. The hip is a weird ellipse shape as well as being on a sharp angle up toward the pivot point of the torso. But, it actually came out better than I thought it would. I plated it up with some 1mm sintra pieces to give it texture and carved in some panel lines. There are still some inconsistencies in the layers but the panels and lines seem to break it up enough to the point that it works.


While I was at it, I got the shoulder piece, upper arm and lower arm done. The arm parts are reversable to swap from right to left, so that helps. I poured molds for all of the above and pulled casts for them all and I'm fairly happy with the result.
These aren't quite up to the ol' pros standards (Fusco, Messydesk, et al), but they work. The casts give me a good base to work from, and with cleanup, extra panels and greeblies, they should be acceptable.


I got the arm articulation pinned up just to check and they worked just about where I'd like. I kinda might want a change to the shoulder joint for more up/down transition, but I can still pose JrJrJr's in a pretty dynamic option. The available poses for the articulation across the board is pretty good.


Yet to do, I have the hands, torso and head. I'm not excited about carving up the hands. Since the right is a fist, that'll be easy. I might cheat and just mount the ML for the left arm on the wrist.. but I think that's cheating. : ) As for the head, I would like to see a head that can turn a bit, but that's a bit tough given the position it has in the torso. I think that the turn of a head really can add dynamicism to the pose, but it may not quite work with this mech. We'll see.

Anyway.. that's it so far. More to come.
Thursday, October 1, 2015
more work
Well, I did some cleanup and rework on Proj. H's legs. I found that I don't like the ankle. I am wondering if it would be better as a ball-and-pin.. where the ball sits into the ankle of the armored shin, and a pin goes into the top of the foot. What I have done for this one is just cut the ankle and pinned it for rotation parallel to the ground. If I were to try casting it for others, that might be what I'd think about, but I'm not sure if I'm willing to go that route yet.
Even though I beefed up the legs a little, they still have that spindly look that the H is notorious for, so that was a side benefit. I also re-cast the greeblies for the outside of the hip joint and I'm much happier about that one.


Even though I beefed up the legs a little, they still have that spindly look that the H is notorious for, so that was a side benefit. I also re-cast the greeblies for the outside of the hip joint and I'm much happier about that one.


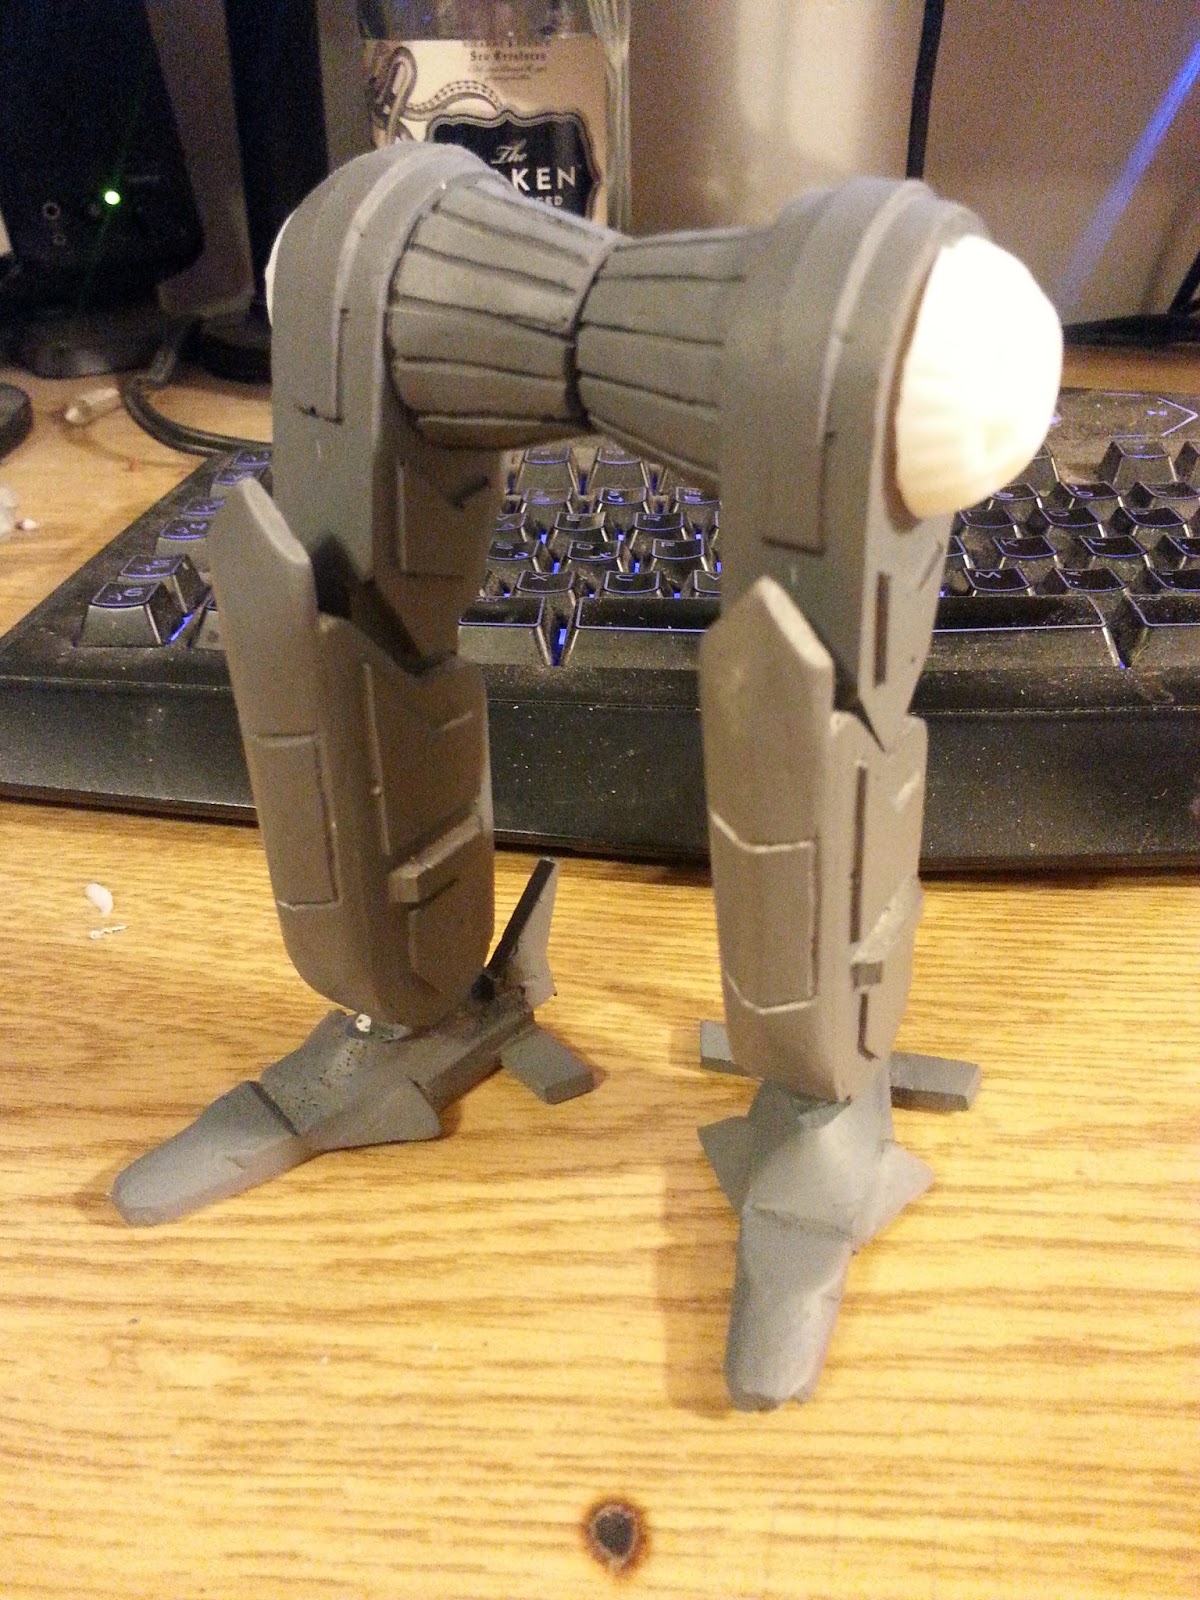
I was starting to get a bit concerned that it might be a bit out of scale to the 45 ton size of the Hatchetman. So I pulled the lower part of Project V-1 and set it side-by-side with them, and it looks like it just might be right.

Now on to the hip and torso.....
Wednesday, September 30, 2015
oops
..crap. I was just going through some of the sketches for the inspiration for Project H, and realized; I forgot the jumpjets.
Ok.. I can fix this. They're mounted to the legs, so I can make Jumpjet greeblies to add to the thigh or shins.
Another thing I'm still chewing on is the AC-10 mounted in the right torso. In almost all the sketches, it's represented as just a hole in the front armor. Blech. I think that looks stupid. But then, just having a tube sticking out of the armor would look just as bad. I might want to alter it a bit to mount a gun assembly something like the under-slung package that the Atlas carries. At least that would have a more interesting look to the build.
The MLs mounted to each arm are simple enough, but that AC-10 definitely needs some design work.
Ok.. I can fix this. They're mounted to the legs, so I can make Jumpjet greeblies to add to the thigh or shins.
Another thing I'm still chewing on is the AC-10 mounted in the right torso. In almost all the sketches, it's represented as just a hole in the front armor. Blech. I think that looks stupid. But then, just having a tube sticking out of the armor would look just as bad. I might want to alter it a bit to mount a gun assembly something like the under-slung package that the Atlas carries. At least that would have a more interesting look to the build.
The MLs mounted to each arm are simple enough, but that AC-10 definitely needs some design work.
Subscribe to:
Posts (Atom)